IPS Server initial configuration
Use a web browser to connect to the IPS Manager (the default URL is http://{server FQDN}/admin). Or use the desktop shortcut created by the install wizard.
A Windows login dialog will appear. You need to use a Windows account which is a member of the 'Palantir IPS Admin' security group; the account that you used for installing IPS Server will have been automatically added to this group.
Assign the data source (IPS common database)
At the first login, there is no connected common database. You will see the message "Common data source is not set".
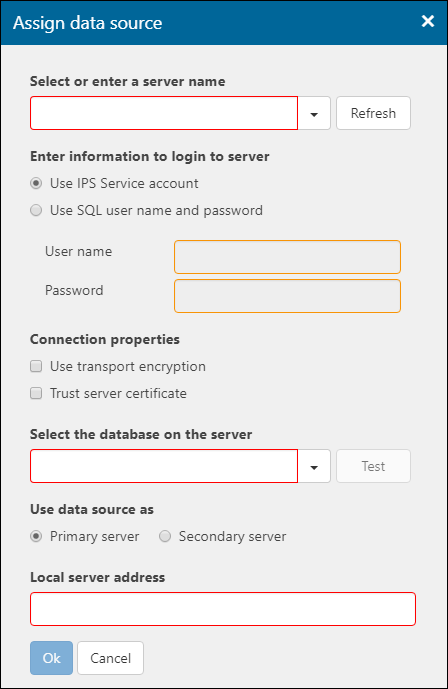
Click the 'Assign' button to open the 'Assign data source' dialog:

Select or enter a server name: either type the name of the SQL Server instance where the common database is stored, or click the down arrow which will show a list of the SQL Server instances detected in the current Windows domain.
Enter information to login to server: Select 'Use IPS Service account' if you have created a SQL Server account that is linked to the IPS Service Account in Windows; otherwise select 'Use SQL user name and password' and type in the username and password of a SQL Server authenticated account.
Connection properties: If the SQL Server is configured with a self-signed or trusted certificate then tick 'Use transport encryption' to enable SSL-based encryption of traffic between the IPS Server machine(s) and the SQL Server machine. If you tick 'Trust server certificate' then the IPS Server machines will automatically trust any certificate that is offered by the SQL Server machine; otherwise the Windows certification protocols must be satisfied.
Select the database: You can type in the database name directly, or click the down arrow to show the list of databases found in the SQL Server instance (note that you may not see any list, depending on the VIEW permissions of the SQL Server account that you are using). Click the 'Test' button to verify the database can be accessed and is ready to be used.
Use data source as: This is the first IPS Server machine, so its role will be 'Primary server' as already selected.
Local server address: This is the server address which is passed to client machine configurations; initially this will be the FQDN of your IPS Server machine.
Click the 'Ok' button to save the information, and close the dialog.
Once the database is connected, default values will be filled in for all of the sections of the IPS Manager 'Service' view (Service, Endpoint, etc). The server Status will appear as 'Being added'.
Click the 'Save all changes' button.
The IPS Service will need to be restarted to implement all of the changes; see below.
IPS Service Account configuration
The following configurations should be have been performed automatically by the install wizard:
- register the web port and monitor port to the service account;
- grant permissions to the service account to read/write in the 'ProgramData' folder that is used by PlanningSpace;
- set the service logon for the IPS Service to the service account.
If any of these seem to be a problem, or you need to modify the service account details, see IPS Service Account configuration.
Restart the IPS Service
Next, restart the IPS Service: use the Windows Server tool 'Services' and find the service named 'PalantirIPS'. Use right click on the service name and select the option 'Restart'.
The IPS Server startup can take several minutes. You should monitor the startup using the Windows Server Event Viewer tool and check for any problems (look in the category 'Applications and Services logs' > 'PalantirIPS Logs'). IPS Server will be running when you see the event message 'PalantirIPS is now running'.
Reconnect to IPS Manager in a browser. The server Status may appear as 'Initializing' and should change to 'Running' after a few minutes.
Upload the IPS license file
In IPS Manager, upload the XML license file that you have obtained from Aucerna Support:
- Click 'IPS Server Licensing' in the main menu, or use the URL:
http://{server FQDN}/admin/#/ipslicensing - Click 'Edit Licenses' and click 'Upload license file'.
- Select the XML license file, and click 'Open'.
Once successfully uploaded, all of the IPS Server functionality will be enabled.
You may also need to install a separate license file for the PlanningSpace and/or SUITE cx applications, after you have created the first tenant. Individual license files are required if you are using 'Per tenant' licensing.
Note that PlanningSpace and SUITE cx license files are 'single use': if you remove an installed license then you cannot re-use the same license file to re-install it.
Applications installed
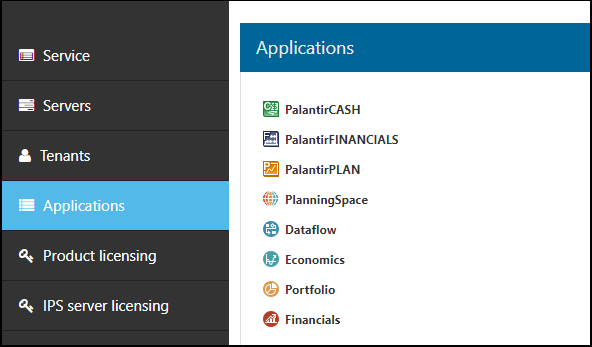
If you click on 'Applications' in the left-hand main menu you should see the applications that have been installed on the server-side, and hence that will be available for tenant users to download and run. But this will not work yet because you have not created a tenant (see the next section).
If you have installed the PlanningSpace applications you will see the following five: PlanningSpace, Dataflow, Economics, Portfolio, and Financials.
If you have installed one or more of the SUITE cx applications, you will see a list corresponding to what you selected during the installation: PalantirCASH, PalantirFINANCIALS, or PalantirPLAN.

Screenshot showing the Applications screen when all of the PlanningSpace and SUITE cx applications have been installed.
